October 15, 2021

88 comments


trunk or treat!

i made it 38 years without hosting trick or treaters at my house... until last year... when only three trick or treaters knocked on my door. turns out, the neighbor kids scored big at the trunk or treat two weeks prior. 
i wasn't going to make the same mistake this year, so i signed up to be a stop along the neighborhood walking trunk or treat. i happen to think i live in the sweetest neighborhood on earth and i'm always sure to i'm working to pull my weight to keep it sweet! except, i've never trunk or treated... and pinterest wasn't serving up very many cute ideas! i kept thinking "i can do better than this!" 
armed with an inspiration image from a meri meri shoot, i marched myself to walmart to bring my vision to life. i can always count on walmart to have everything i need, no matter how wild my ideas. they're never fully formed when i pull into the parking lot, but i wander the aisles and they comes together. walmart home is quickly becoming my favorite resource for the most accessible, high quality products for my home. 
okay! here's how my spooky eyeball trunk came together! 
supplies:
electric balloon pump
balloons
crepe paper streamers
party plates
cardstock
curling ribbon
command strips
i used every round object around the kitchen to make the eyeballs. the colorful party plates came in really great colors and were super affordable, so i opted to use those instead of basic cardstock. 
i traced the paper plates (bigger) out of things like cereal bowls and dessert plates, while the black cardstock (smaller) came from drinking glasses and candle jars. i simply tapes them together with tape circles. if they were designed for anything more permanent, i would have used a glue stick or a hot glue gun.
i blew balloons of varying size/fullness while in my kitchen, connected to a power supply, but it would have been a bit smoother had i not had to transport 50 loose balloons from the house to the car :) 
i put my high school student body officer skills to work (again) to make an old school balloon arch. i tie two balloons to each other, ensuring the curling ribbon gets roped into the tie. each duo gets tied opposite of the set before it, making a tight, full string of balloons. using varying sizes of balloons keeps things from looking less like a used car lot and more like a party. 
install had to happen in place so i didn't lose balloons along the way. i wasn't sure exactly where and how the balloon arch would best fit in my open trunk, so i came armed with an arsenal of supplies just to be safe. i used command strips to attach the balloon arch to my car. add in a little streamer and lots and lots of tape circles to attach the eyeballs and it's done! i filled my trunk with extra balloons (that came spilling out all night long!) to keep the trunk looking full. not every balloon had an eyeball attached, but lots did!
shop this post:
this post was sponsored by walmart. 
July 29, 2021

189 comments


weekend guest room refresh!


because my house is relatively small (1,250 square feet!), everything has to have a place and there's not much room for extra. but! i love so many things! my neighbor called me an "opportunity shopper" - which, i'll be adding to the top of my personal resume, thanks. 

my guest room has become the landing place for all the things i don't need rightthisminute... but it's been a lot of minutes, so it was due for deep clean and refresh.

functionally, all the pieces were there, but nothing fit just right. i upgraded the bed from a full to a queen a while ago, which made just a little too tight of a squeeze to access everything in storage. i purged and i prayed over what NEEDED to stay, knowing it was going to be whittled down to what i could fit into three shallow bookcases from walmart. since this was a blitz of weekend project, i knew i could count on walmart home to have all the supplies i needed in stock and available at my fingertips. what i've come to appreciate about walmart is that they've got the functional and decor items covered. it's form AND function which is what my house has to be about because it's so small. 

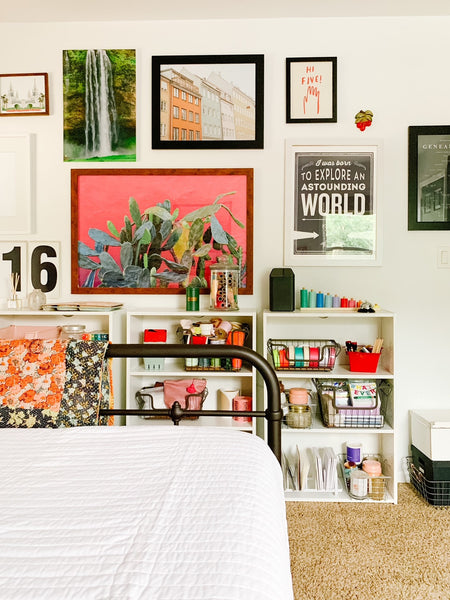
featured: wall frames | white book cases | storage baskets | metal bed frame | glass jars | white blanket 

95% of the time this room belongs to me but when the guests come to town, i want it to be a comfortable place to stay. the clean white linens serve as a much-needed calm foundation to an otherwise noisy room. 


featured: quilted sham | cotton blanket

in a real life vs. instagram moment... the guest room is also the room where the really functional things live. after five years with the internet-worthy vacuum stick, i kicked it to the curb for the trustiest, tried and true push vacuum. i bought mine at walmart about six months ago and i.am.never.going.back! it was also a an impulse buy after a frustrated saturday chore day and i've never been so happy to vacuum my house! (p.s. if you haven't heard of slow vacuuming, it's exactly what it sounds like. push and pull the vacuum, but be sure to go slow, and you'll be shocked by what comes up when you take a little extra time!)


featured: vacuum | box spring cover

i'm happy to report i put the finishing touches on the guest room on sunday afternoon. hung a few frames to finish the gallery wall, tucked those hospital corners on the bed, and organized the ribbon supply for the next emergency party. and now i'm ready for my next round of guests!


you can shop my favorites below

June 29, 2021

115 comments


Waffles for Breakfast

My dad and nephews came into town last weekend - something we've all been looking forward to for a long time! My brother and sister in law work quite a bit and the boys were bursting at the seams for a change of scenery. As the only girl, sandwiched between four brothers, I don't have to fight for my title as Favorite Aunt - but still... teenage boys are hard to impress, so I pulled out all the stops to make sure they had something good to report about their trip.

Before they came, I asked my sister in law and mom about their favorite snacks and drinks and meals - I knew Walmart would truly be a one-stop-shop for the weekend for food and extra kitchen gear. This single-woman household doesn't always have five of everything when it comes to my kitchen supplies! As expected, I got carried away in the home department and stocked up on cups, dishes, serving spoons, tablecloths, etc. because the store had such a great supply of dishes and homeware that was right up my alley. In my house, red is a neutral, and if you know me, you know I'm committed to wearing/using/displaying any combo of red/white/blue every day, in as may ways as possible, through June and July and Walmart Home had my back.

I spoiled them with a hot breakfast every morning and Mason, the ten year old, discovered a new love for helping in the kitchen. I heard the boys love toaster waffles, so I wanted to show them how much better a fresh, homemade waffle could be than the frozen ones. I TRIPLED this waffle recipe (it's a keeper) for the hungry boys. While I was in the market of outdoing myself, I set the table, complete with a tablecloth and candles. Teenage boys could eat off a paper plate in the living room, but I wanted them to know they deserved nice things, too. 

They could drink orange juice by the gallon, so the extra tall juice glasses were a welcomed addition to the table. And these plates were sized to fit waffles-to-feed-a-growing-teenage-boy helpings, three times over. 

They requested fresh fruit with every meal, which makes me think their parents are doing something right! I was happy to oblige and they were even willing to work in the kitchen to make sure there was plenty to go around. 

And my hero dad, who knew it was a photo worthy moment and offered to capture it with the big camera. 

This post is sponsored by Walmart. I have accepted compensation in exchange for this post.  

Everything on the table is available at Walmart and can be shopped right here: 

June 30, 2020

2605 comments


Fourth of July in a Pandemic

I've never met a holiday I didn't love, but Fourth of July has a permanent place at the top of the list. When life was normal, celebrations started the night before at my city's 3rd of July firework show (smart, if you ask me... double the fun + no other events to compete for your attention), and then all the usual tricks on the fourth. A parade, some kind of body of water, watermelon, a grill, and our own firework show in the driveway. The day is 3289546 hours long and I soak up every minute. 
This year, though, without a parade and pools closed, we're on the hook to make our own fun from sun up to sun down. And since subtle isn't a word in my vocabulary, we're pulling out all the stops. 
pops | sparklers | balloons | straws | table cloth 

We've started planning weeks ago - the group text is going strong with our itinerary and assignments for meals, the group firework fund, and THE MOST EXCITING EVENT: our very own parade! The adults ARE the parade and the kids are the candy catchers. We're decorating cars, throwing candy.... everything just short of learning to play every.single.instrument in a marching band and custom fitting ourselves in matching polyester uniforms. I'm not that crazy. 
I've partnered with eBay to find all my supplies in one place. It's been the best one-stop-online-shop for every thing on my wish list.

Party supplies? Check.
Candy? Check.
Sparklers and pops? Check check.
Plates, straws, and flatware? Check check check.

There wasn't a single thing I searched for that didn't come up with options on end. And even better, I'm supporting the small businesses who have taken advantage of their Up and Running program to keep business chugging while brick and mortar life is in flux. It's easier than ever to shop small, down to the wall art and the clear plastic bags for our candy. The Up and Running Program gives shoppers and opportunity to support small businesses without leaving home, and gives small business owners a leg up with a free store front and no selling fees for a time. 

The best part of the parade is the candy - and we're throwing the cheap stuff!

gumballs | gummies | taffy | poly bags | baker's twine

And the balloons! I'm putting my Class of '99 spirit week skills to work with a balloon arch for our parade.  I couldn't help get a practice round in. It was 21 years ago... 

balloons | helium tank
 
For those interested in a how-to, attach your string - plain ol' curling ribbon will do just fine -  to something secure on one end. Using a helium tank (and Hi-Float if you want it to last a while), fill two balloons, but don't tie the ends in knots individually. You're going to wrap the ends of the two balloons around each other once, and then include the curling ribbon in between the balloons before tying the knot. You'll repeat with the next set of balloons. With the first set of balloons heading east and west, the second set are positioned north and south. It happens naturally, as the balloons are pulled up on the string, close to the previous set. They sit off-set from each other and you repeat, as many times over as you need to fill your space. There are approx 44 balloons on the practice arch I made - perfect size for decorating my car for the parade!

The face of a student council has-been who's never been prouder. 

A few other sweet things to make the day extra sweet:
Have you seen the red white and blue sour patch kids?
Everyone needs an American Flag!
Artwork! It's fitting all year long, but even sweeter as we celebrate our freedom.
Banners!  
Yard Games! Kubb, lawn bowling, and ladder golf

This post was sponsored by eBay.

Shop this post: 
 
 
November 28, 2019

9990 comments

gifts ›  


a wish list (for me). a gift guide (for you).

a few of my favorite things for favorite things season! 

since i ran through my go-to gifts to give at favorite things party in my instagram story a few weeks back, i've been keeping extra thoughtful notes about things that i already own and love so much... things that might feel a little bit more special than the regular things we see flying through our sponsored ads or the typical internet favorites.
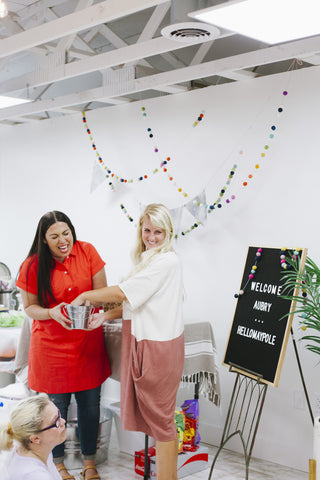
View full article →
August 15, 2017

62 comments


workshop season!

we hit the road this summer and brought the wreaths + garlands to our friends and customers who we might not otherwise meet. if i had to name one favorite thing about being a business owner or being a part of the small shop market, it's - hands down - meeting my kind customers! it's such a treat putting names to faces and getting to know so many new friends. after hearing from a few friends that they had some felt balls stashed away at home that they never got around to stringing, i knew workshops were the answer... why not create a social occasion for making and friending?!
long time friend kylee from roolee opened her doors and welcomed us with open arms. her crew also decked the place from floor to ceiling with felt balls and roolee-worthy decor. 
with a few of these workshops under my belt by now, i've learned a thing or two about how to best be prepared:
1. bring extra felt balls.
2. in all the colorways.
3. bring a lot of them.
once the hustle of set up is under control and the workshop really gets going, i get to sit back and see what other people do with their colorways. i grow so accustom to the way i set the patterns + order of each colorway so long ago, it's so refreshing to get someone else's eyes on the colors! 
it's also so interesting to see how much more, better organized my customers are than i am when it comes to stringing garlands! maybe i lost that luxury a long time ago when i chose to make a business out of craft + party supplies... but check this out! 
im.press.ive!
i was a little bit hesitant to group the wreath makers with the garland makers because the wreaths take SO much longer to make than the garlands do to string, but it turns out, they take the same amount of time when there are friends to talk to!
and can you even handle the mother/daughter craft dates?! i love that hello maypole is a thing that can bring mothers + daughters together. 
and swooping in at the 11th hour, mckenzie from citrus pear reached out and asked if she could cater the night. what!? i thought it was for sure a great big trick! too good to be true! if you know me, you know i'm weak for a hot, home cooked meal... cooked by someone other than me! :) citrus pear DID NOT disappoint! she also offered to give away a ten-meal prep session to one of our workshop attendees, which got the ball rolling with giveaways from hello maypole and roolee, too! 
we don't have any plans to slow the workshop game anytime soon. we're aiming for boise, st. george, and more in salt lake!
April 07, 2017

170 comments

DIY ›   Party ›   Tutorial ›  


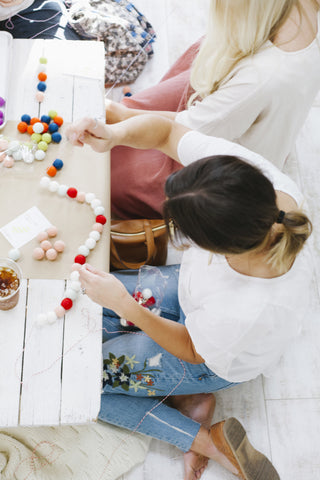
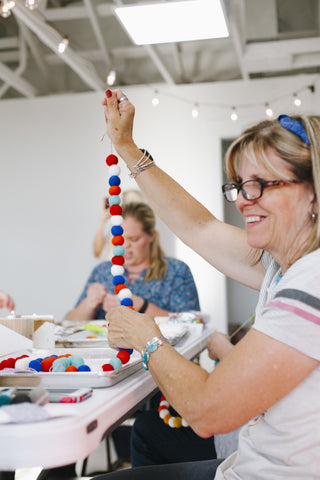
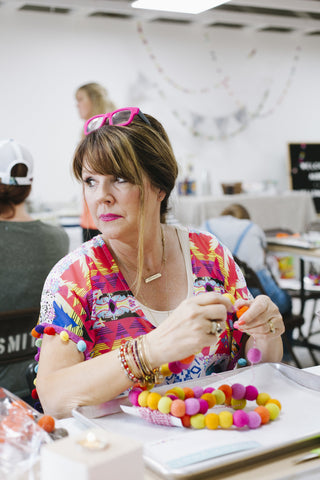
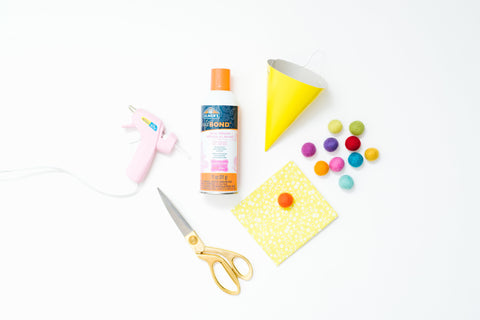
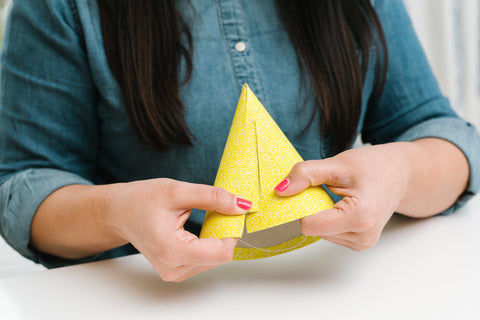
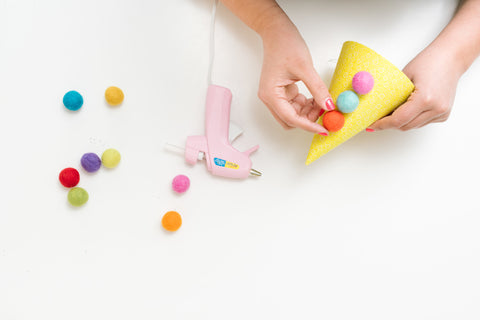
Felt Ball Party Hat DIY

You may have seen the party hats we made for the kids in our booth at Magnolia last month when we attended Spring at the Silos - major, major hit! While I might be a crazy person for making 80 of them at once, they're simple enough to make for your next party!
You'll need:
Begin by opening the party by bending up the lower tab on the inside of the hat, until it's flush with the opening on the other side. Then slide the top tab out of the opening, slowly, to avoid ripping the hat. Choose the most closely related color of hat to match your fabric. Most fabrics are opaque enough that it won't matter, but just in case, don't choose a blue hat to go under white fabric!
Trace the party hat onto your fabric with a pencil, with the outside part of the hat face down on the wrong (back) side of the fabric. Trim about a half inch away from your tracing, leaving room for precision after it's glued. 
Outside, or in a well ventilated area - either on a stretch of newspaper or on the inside of a box - spray the back side of the fabric with the spray glue. Quickly, place the flattened party hat against the glued fabric and pull out any wrinkles in the fabric. 
Trim the excess fabric from the two sides, but leave the half inch spare fabric along the bottom. 
Don't forget to trim in and around the slits and the tabs. 
Along the bottom, make vertical cuts every half inch or so. The spray glue will, at this point, still be a bit tacky - but not enough to ruin your scissors :)
Fold the small cuts of fabric up, into the inside of the party hat. This will create a smooth, glue-free edge along the bottom of the party hat and far away from your kids' hair!
Reassemble the hat by reinserting the tabs into the slit in the hat. This step covers up so many of my imperfections, so if you're stressed about doing it perfectly, this step is all about redemption!
And now decorate! Sky's the limit here - place three down the line (make sure your "line" is opposite the slit in the back and/or centered on the elastic string under the hat. 
Felt balls can also be glued around the bottom edge of the hat or randomly placed about the hat.
Finish it off with felt ball on top!
For a simple party activity, prepare and assemble the hats up until the point where the felt balls are glued. Depending on their age and trust with a glue gun, use either a high heat or a low temp glue gun and give the kids a little freedom to attache the felt balls where and how they'd like!
For those who didn't catch it on Facebook, I was a guest on the local mid-day news channel, Studio 5. We made up a few spring/Easter garlands, and showed a quick how-to of the party hats! Catch it here
November 16, 2016

1492 comments


Felt Ball DIYs Coming Soon!

My hope with these blog posts is to share and easy party and crafting DIYs to inspire you to think outside the garland box! Sky's the limit when it comes to these babies! I've brought on some of my very best creative brains to drum up some crafts - stay tuned!